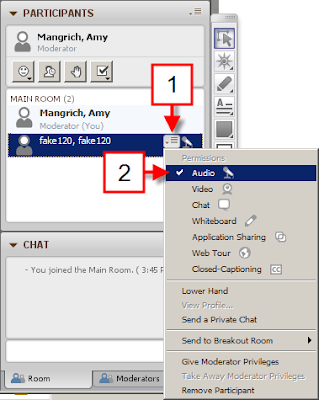
Once you are in your virtual meeting room as a Moderator, click the [Participant Options Menu] button to the right of the participant's name in the [Participants] window. Check the [Audio] button looks like a microphone.

Make sure that the participant runs the [Audio Setup Wizard] to ensure that the audio is configured correctly. This can be performed by going to [Tools], [Audio], [Audio Setup Wizard...]
Once configured, students will need to click the [Talk] button in the [Audio & Video] window to use the microphone.
Tips:
1. When using audio communication, participants should access Online Rooms through a high-speed internet connection. If delays occur or the audio breaks up, participants should also be hardwired connection, meaning they must connect their computer to the internet using an Ethernet cable.
2. When using audio communication, participants should use a microphone headset to achieve consistent quality audio and prevent echoing. If a participant is using the microphone in their laptop, then they MUST use a pair of headphone to listen to the session. The headphones should to be connected to the audio port in the laptop (usually indicated by an icon that looks like a pair of headphones) which will disable the sound from coming out of the laptop speakers and prevent echoing audio.
Recommendations:
A noise-cancelling USB connected microphone headset is recommended for using audio communication in Online Rooms. One can be purchase from Logitech.com, here: http://bit.ly/WaCEJ or from Amazon.com, here: http://bit.ly/Jiq2x